
地下城配置
配置库,带有受《我的世界:地下城》启发的视觉风格,以及配置界面的完全可定制性。
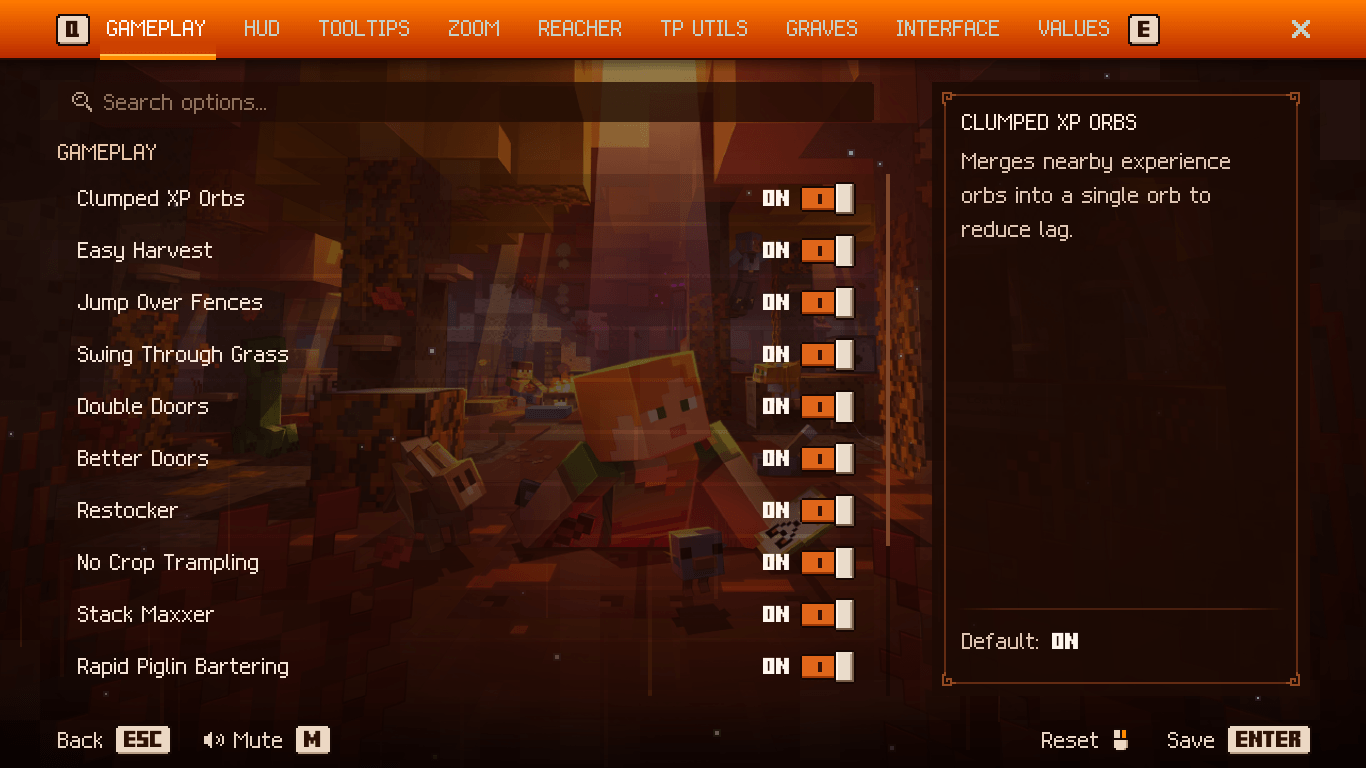 查看大图
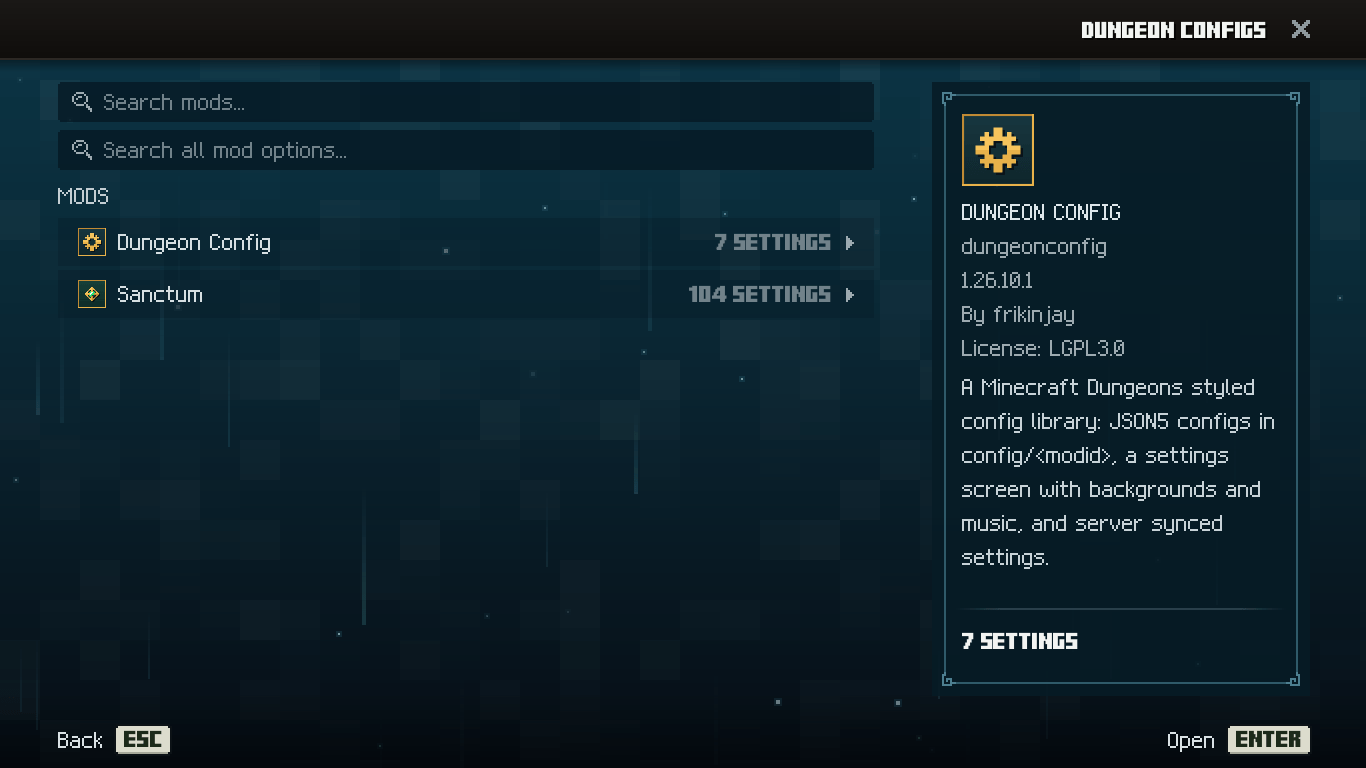

一个面向 Fabric 和 NeoForge 模组的配置库,内置 Minecraft Dungeons 风格的设置界面。
你在代码中声明选项,Dungeon Config 随后负责处理:
- 一个带注释的 JSON5 文件,位于
config/<modid>/<modid>.json5,按你的顺序写入,并在每个值上方保留你的注释。 - 一个完整的设置界面,包含标签页、分区、搜索、滑块、下拉框、注册表选择器、工具提示、未保存更改提示和重启通知。你无需编写任何 GUI 代码。
- 在共享的 “Dungeon Configs” 页面中占有一席之地。 玩家可从标题界面按钮、Ctrl + K,或 Dungeon Config 在 Mod Menu 和 NeoForge 模组列表中为你添加的 Config 按钮进入。
- 可选的服务器 → 客户端同步,按选项单独启用,且绝不会覆盖玩家自己保存的值。
- NeoForge 风格的重启语义(
worldRestart()/gameRestart())。 - 可直接替换 NeoForge 的
ModConfigSpec、Cloth Config 的AutoConfig和 NightConfig 的CommentedFileConfig,因此移植现有配置基本只需更改导入,且玩家旧的配置文件会自动导入。 - 按模组的界面主题: 背景图片、GIF 或视频、菜单音乐、字体和颜色。玩家可以覆盖所有这些设置。
1. 添加到你的构建
Dungeon Config 尚未发布到公共 maven。请将其发布到你的本地 maven:
cd DungeonConfig-26.1.2   # 或 DungeonConfig-1.21.1
./gradlew publishToMavenLocal
这会发布三个构件:
| 构件 | 用于 |
|---|---|
com.frikinjay:DungeonConfig-26.1.x-common:<version> |
common |
com.frikinjay:DungeonConfig-26.1.x-fabric:<version> |
fabric |
com.frikinjay:DungeonConfig-26.1.x-neoforge:<version> |
neoforge |
在 1.21.1 上,前缀为 DungeonConfig-1.21.1-。
将 mavenLocal() 添加到你的仓库,然后:
26.1.2:
// common/build.gradle
compileOnly "com.frikinjay:DungeonConfig-26.1.x-common:1.26.10.2"// fabric/build.gradle
implementation "com.frikinjay:DungeonConfig-26.1.x-fabric:1.26.10.2"
include "com.frikinjay:DungeonConfig-26.1.x-fabric:1.26.10.2"      // jar-in-jar
// neoforge/build.gradle
implementation "com.frikinjay:DungeonConfig-26.1.x-neoforge:1.26.10.2"
include "com.frikinjay:DungeonConfig-26.1.x-neoforge:1.26.10.2"    // jar-in-jar
1.21.1:使用相同的行,但将 compileOnly / implementation 替换为 modCompileOnly / modImplementation。
打包还是作为依赖?
- 打包(
include): 玩家无需额外安装任何东西。如果多个模组都打包了它,或者玩家也单独安装了它,加载器会选择最新的副本。 - 作为依赖: 去掉
include行,并将其列为必需依赖。
无论哪种方式,都要声明依赖:
// fabric.mod.json
"depends": { "dungeonconfig": ">=1.26.10.2" }
# neoforge.mods.toml
[[dependencies.yourmodid]]
modId = "dungeonconfig"
type = "required"
versionRange = "[1.26.10.2,)"
ordering = "NONE"
side = "BOTH"2. 你的第一个配置
public final class MyConfig {
    public static final DungeonConfig CONFIG = DungeonConfig.builder("mymod")
            .displayName("My Mod")              // 可选,默认为模组元数据中的名称
            .build();public static final ConfigEntry<Boolean> PARTICLES =
        CONFIG.addBoolean("particlesEnabled", "Visuals", true, "Show custom particles");

public static final ConfigEntry<Integer> AURA_RADIUS =
        CONFIG.addInt("auraRadius", "Gameplay", 16, 1, 64, "Radius of the aura in blocks");

public static final ConfigEntry<Double> SPEED =
        CONFIG.addDouble("speed", "Gameplay", 1.0, 0.1, 10.0, "Movement speed multiplier")
              .withUnit("x").withStep(0.05);

public static final ConfigEntry<String> GREETING =
        CONFIG.addString("greeting", "General", "Welcome!", "Message shown on join");

public static void init() {
    CONFIG.load();   // 在所有条目都存在之后:读取文件,若不存在则用默认值创建
}

}
在你的通用模组初始化器中调用 MyConfig.init(),然后可在任何地方读取值:
if (MyConfig.PARTICLES.get()) spawnParticles(MyConfig.AURA_RADIUS.get());磁盘上的文件最终看起来像这样:
// My Mod configuration
// This file uses JSON5 syntax (https://json5.org/)
{
  // Show custom particles
  "particlesEnabled": true,  // Radius of the aura in blocks
  "auraRadius": 16,
  ...
}
如果玩家手动将其编辑为无效内容,损坏的文件会保留为 .bad-<date>,并写入一个干净的文件。超出范围的数字在加载时会被限制到范围内。
add* 辅助方法
| 方法 | 界面控件 |
|---|---|
addBoolean(name, category, default, comment) |
开关 |
addInt(name, category, default, min, max, comment) |
滑块 |
addLong(name, category, default, min, max, comment) |
滑块 |
addDouble(name, category, default, min, max, comment) |
滑块 |
addString(name, category, default, comment) |
文本框 |
对于其他内容(枚举、列表、自定义类型),自行构造条目并 add:
public enum Mode { FAST, FANCY, OFF }public static final ConfigEntry<Mode> MODE = CONFIG.add(
        new ConfigEntry<>("renderMode", "Rendering mode", "Visuals", Mode.FANCY, Mode.class));   // 下拉框
public static final ConfigEntry<String> ICON = CONFIG.add(
        new ConfigEntry<>("iconItem", "Item shown as the icon", "General", "minecraft:diamond", String.class)
                .withRegistry(BuiltInRegistries.ITEM));                                           // 可搜索的物品选择器
也支持列表和自定义 POJO。列表在界面上以逗号分隔的文本进行编辑,自定义类型通过 Gson 存储为 JSON。下面的 ModConfigSpec 路线是定义列表最简单的方式。
3. 条目选项
每个选项都链式挂在条目上并返回该条目,因此可以内联设置。
显示
| 选项 | 效果 |
|---|---|
.withSection("Homes") |
标签页内的子标题 |
.withLabel("Nice Name") |
没有语言键时的显示名称 |
.withChoices(a, b, c) |
显示为限制为这些值的下拉框 |
.withUnit("%") |
数字后的单位。以 Percent、Seconds、Minutes 或 Fps 结尾的名称会自动获得一个单位。 |
.withStep(0.5) |
滑块刻度 / 方向键增量 |
.withValueName(0, "Default") |
按名称显示某个值,用于具有特殊含义的值(每个值调用一次) |
验证
| 选项 | 效果 |
|---|---|
.withValidator(obj -> ...) |
拒绝未通过检查的值 |
.withRegistry(registry) |
字符串条目上的可搜索注册表 ID 选择器 |
.withRegistry(registry, allowed) |
限制为这些对象或 ID 的选择器 |
.withRegistryFilter(predicate) |
限制为匹配谓词的对象的选择器 |
列表
| 选项 | 效果 |
|---|---|
.withElementType(Class) |
列表项的元素类型,使 1 保持为 Integer 而不会变成 Double |
.withElementValidator(...) |
检查每个列表元素 |
.withSizeValidator(...) |
检查整个列表 |
.withMinEntries(n)、.withMaxEntries(n) |
列表大小限制 |
.withListAllowEmpty(bool) |
空列表是否有效 |
.withElementSupplier(...) |
新列表元素的默认值 |
同步与重启
| 选项 | 效果 |
|---|---|
.synced() |
连接时使用服务器的值(见 §5) |
.syncedOr(value) |
类似 synced(),但在不发送值的服务器上使用 value |
.serverOwned() |
属于服务器的数据(见 §5):同步,绝不从文件读取或写入文件,并且在远程服务器上在界面中锁定 |
.withRestart(RestartType.WORLD | GAME) |
保留旧值直到重新加入 / 重启(见 §6) |
读取和写入值
| 方法 | 返回 / 作用 |
|---|---|
get() / getValue() |
当前生效的值:同步时为服务器值,重启待定时为保留的值。任何线程安全。 |
getLocalValue() |
玩家自己保存的值,忽略服务器和重启保留 |
getServerValue()、isServerControlled() |
检查同步状态 |
isServerOwned()、isLocked() |
该选项是否属于服务器,以及界面当前是否不得更改它 |
isRestartPending() |
当保存的更改等待重新加入或重启时为 true |
set(v) / setValue(v) |
如果通过验证,更改本地值 |
setClamped(n) |
设置一个数字,限制在范围内 |
resetToDefault()、isDefault()、getDefault() |
默认值 |
通过 set 所做的更改在你调用 CONFIG.save() 之前不会写入磁盘。
4. DungeonConfig 对象
构建器选项
| 构建器选项 | 效果 |
|---|---|
.displayName(name) |
界面和 Dungeon Configs 页面上的名称 |
.fileName(name) |
配置文件名,如果不是 <modid> |
.spec(spec) |
使用 NeoForge 风格的 ModConfigSpec(§7) |
.appearanceCategory("Interface") |
背景和音乐设置的标签页。默认:Appearance。 |
.defaultBackground(...)、.defaultMusic(...)、.defaultColors(...) |
默认界面媒体(§9) |
.defaultBackgroundBlur(int)、.defaultBackgroundDim(int)、.defaultBackgroundFps(int)、.defaultMusicVolume(int) |
这些外观设置的默认值 |
.noAppearance() |
完全省略背景和音乐设置 |
.noFireflies() |
关闭你界面上的环境粒子效果 |
运行时方法
| 方法 | 作用 |
|---|---|
load()、reload()、save() |
文件 I/O |
onSaved(runnable) |
界面(或 save())写入文件后的回调。用于重建缓存。 |
setOrder(list) |
重新排列文件和界面中的条目 |
remove(name) |
删除一个条目,用于游戏运行时出现和消失的选项(例如列表中每个物品一组)。条目也可以在其 load() 之后通过 add(...) 添加;界面在保存时会拾取这两类更改。 |
entries()、entry(name)、categories() |
内省 |
revision() |
一个数字,在条目被添加、删除、重排或获得新的服务器值时变化。打开的界面会在其变化时重建。 |
onServerValues(runnable) |
客户端在服务器值到达后以及离开时清除后的回调 |
hasServerValues() |
当前是否持有服务器值 |
syncFilter((player, json) -> ...) |
调整发送给某个玩家的值,例如省略他们不可见的数据 |
syncedValuesFor(player) |
该玩家将被发送的值 |
directory() |
config/<modid>,用于你自己的额外文件 |
DungeonConfigs.get(modId) 和 DungeonConfigs.all() 可让你获取任何已注册的配置。
5. 服务器同步
标记必须在服务器和客户端之间保持一致的选项。游戏规则是典型情况:堆叠大小、碰撞、伤害数字。
// 连接时为服务器值;在没有该模组的服务器上为 false
public static final ConfigEntry<Boolean> BIG_STACKS =
        CONFIG.addBoolean("bigStacksEnabled", "Gameplay", true, "Stacks of 64").syncedOr(false);// 连接时为服务器值;在没有该模组的服务器上为玩家自己的值
public static final ConfigEntry<Integer> RADIUS =
        CONFIG.addInt("radius", "Gameplay", 8, 1, 64, "Effect radius").synced();
同步行为:
- 何时发送值: 加入时,以及单人游戏或 LAN 主机每次保存时。
- 发送哪些类型: 枚举、列表和自定义类型都能正确往返。
- 玩家自己的值绝不会被覆盖。 它单独保存,并在单人游戏和其他服务器上恢复。界面在受服务器控制的选项上显示徽章,让玩家知道为什么他们的更改没有生效。
- 握手在双方都是可选的。 原版客户端和没有该模组的客户端仍然可以加入,反之亦然。
服务器拥有的选项
有些选项是服务器自己保留的数据,例如服务器端列表的每个条目对应一组选项。将它们标记为
.serverOwned()。它们不会出现在配置文件中(模组自己存储它们),会被同步,并且在远程服务器上
客户端持有服务器的值,界面以只读方式显示它们。要在客户端的服务器列表变化时创建和删除它们,请监听服务器值:
CONFIG.onServerValues(() -> {
    if (!CONFIG.hasServerValues()) RULES.set(new ArrayList<>()); // 玩家离开了
    MyRules.matchList();                                         // 为每个条目添加或删除一组选项
});
从监听器添加的选项会拾取服务器已经发送的值。使用 syncFilter 只向每个玩家发送他们可以
看到的内容。
6. 重启语义
这与 NeoForge 的 ModConfigSpec 一致。有些选项无法在会话中途安全更改,例如在世界加载或注册表阶段只读取一次的任何内容。
public static final ConfigEntry<Integer> ORE_VEINS =
        CONFIG.addInt("oreVeins", "World", 8, 0, 32, "Veins per chunk")
.withRestart(RestartType.WORLD); // 或 RestartType.GAMEWORLD:get()会持续返回进入世界时的值,直到玩家离开该世界,即使界面保存了新值。GAME: 值会保留到游戏重启。- 玩家看到的: 界面会标记这些选项,并在保存后显示 Restart Needed 对话框。
- 自行检查:
isRestartPending()和getLocalValue()让你查看待定值。
7. NeoForge 风格的 ModConfigSpec
如果你从 NeoForge 移植,或者只是喜欢 spec 构建器:
public final class MyConfig {
    private static final ModConfigSpec.Builder BUILDER = new ModConfigSpec.Builder();static { BUILDER.push("Combat"); }

public static final ModConfigSpec.DoubleValue CRIT = BUILDER
        .comment("Critical hit damage multiplier")
        .defineInRange("critMultiplier", 1.5, 1.0, 5.0);

public static final ModConfigSpec.EnumValue<Mode> MODE = BUILDER
        .comment("Rendering mode")
        .defineEnum("mode", Mode.FANCY);

public static final ModConfigSpec.ConfigValue<List<String>> BLOCKS = BUILDER
        .comment("Blocks the effect ignores")
        .worldRestart()
        .defineListAllowEmpty("ignoredBlocks", List.of("minecraft:bedrock"), o -> o instanceof String);

static { BUILDER.pop(); }

public static final ModConfigSpec SPEC = BUILDER.build();
public static final DungeonConfig CONFIG = DungeonConfig.builder("mymod").spec(SPEC).build();

}
支持的构建器方法:
push/pop(推入的路径成为界面分类)comment、translationdefine、defineInRange(int / long / double /Comparable)defineInList、defineEnum(带主体的枚举常量也可以)defineList、defineListAllowEmptyworldRestart()、gameRestart()
值通过 .get() 读取,与 NeoForge 中一样。spec 的条目是普通的 ConfigEntry,因此 §3 中的每个选项也适用于它们。
8. 从 NeoForge、Cloth Config 或 NightConfig 迁移
Dungeon Config 可以替代模组最常用的三个配置库。在每种情况下,代码几乎不变,玩家已经保存的值会在游戏首次使用 Dungeon Config 运行时导入。
从 NeoForge / Forge 的 ModConfigSpec
将 net.neoforged.neoforge.common.ModConfigSpec(或 Forge 的 ForgeConfigSpec)替换为 com.frikinjay.dungeonconfig.api.ModConfigSpec,将 spec 交给构建器(§7),并指向旧的 TOML 文件:
public static final DungeonConfig CONFIG = DungeonConfig.builder("mymod")
        .spec(SPEC)
        .migrateFrom("mymod-common.toml")                      // config/mymod-common.toml
        .migrateKey("general.blacklist", "blacklistItems")     // 仅用于你重命名的键
        .build();
去掉 container.registerConfig(...) 调用:现在由 Dungeon Config 拥有该文件。
从 Cloth Config(AutoConfig)
更改导入并保留该类:
| Cloth Config | Dungeon Config |
|---|---|
me.shedaniel.autoconfig.AutoConfig |
com.frikinjay.dungeonconfig.compat.cloth.AutoConfig |
me.shedaniel.autoconfig.ConfigData / ConfigHolder |
com.frikinjay.dungeonconfig.compat.cloth.ConfigData / ConfigHolder |
me.shedaniel.autoconfig.annotation.Config / ConfigEntry |
com.frikinjay.dungeonconfig.compat.cloth.Config / ConfigEntry |
me.shedaniel.autoconfig.serializer.JanksonConfigSerializer(Gson、Toml4j) |
com.frikinjay.dungeonconfig.compat.cloth.JanksonConfigSerializer(Gson、Toml4j) |
Jankson 的 @Comment |
com.frikinjay.dungeonconfig.compat.cloth.Comment |
@Config(name = "mymod")
public class MyConfig implements ConfigData {
    @Comment("Show custom particles")
    public boolean particles = true;@ConfigEntry.BoundedDiscrete(min = 1, max = 64)
public int auraRadius = 16;

@ConfigEntry.Gui.CollapsibleObject
public Combat combat = new Combat();

public static class Combat {
    public List<String> immuneMobs = List.of("minecraft:wither");
}

}
AutoConfig.register(MyConfig.class, JanksonConfigSerializer::new);
MyConfig config = AutoConfig.getConfigHolder(MyConfig.class).getConfig();
- 每个字段变成一个条目,以字段命名。嵌套对象变成分区,
@ConfigEntry.Category选择标签页,@BoundedDiscrete生成滑块,@Gui.RequiresRestart生成游戏重启选项,@Gui.Excluded省略字段。 - 对象保持最新。
getConfig()始终返回同一个对象,其字段在每次加载、每次界面保存和每次服务器同步后刷新。holder.save()将你的字段更改写回。 - 保存和加载监听器在更改后运行。它们的返回值被忽略。
- 旧文件只导入一次。 序列化器为其命名:
config/<name>.json5(Jankson)、.json(Gson)或.toml(Toml4j)。然后重命名为<name>.json5.migrated。 - 选择模组 ID。 它来自
@Config(modId = "..."),否则当name是已加载的模组 ID 时来自name,否则来自name中第一个-之前的部分。同一模组的第二个@Config类获得自己的标签页和带前缀的键。 - 无需 GUI 代码。 Mod Menu / NeoForge Config 按钮和
AutoConfig.getConfigScreen(...)会打开 Dungeon Config 界面。
从 NightConfig(CommentedFileConfig + ConfigSpec)
将 com.electronwill.nightconfig.core.* 和 com.electronwill.nightconfig.core.file.* 替换为 com.frikinjay.dungeonconfig.compat.nightconfig.*:
CommentedFileConfig config = CommentedFileConfig.builder(configDir.resolve("mymod-common.toml"))
        .autosave()
        .build();
config.load();ConfigSpec spec = new ConfigSpec();
spec.defineInRange("general.maxMana", 100, 10, 500);
spec.defineList("general.blockedItems", List.of("minecraft:tnt"), o -> o instanceof String);
spec.correct(config);
config.setComment("general.maxMana", "Largest mana pool");
int maxMana = config.getInt("general.maxMana");
- 每个路径变成一个同名条目。 第一段是标签页,中间段是分区。Spec 范围变成滑块,
defineInList和枚举变成下拉框,spec 的检查也会在界面上运行。 - 你给构建器的路径只是旧文件。 值保存在
config/<modid>/<modid>.json5,旧的 TOML 或 JSON 在首次加载时导入,然后重命名为.migrated。 - 选择模组 ID。 它来自文件名(当该模组已加载时,
mymod-common.toml给出mymod),或用.modId("mymod")设置。同一模组的第二个文件共享其配置,其键带有前缀(mymod-client.toml为client.)。 - 忽略的构建器选项。
sync()、autoreload()、writingMode(...)等被接受但不起作用:Dungeon Config 始终以原子方式写入。
手动导入任何旧文件
DungeonConfig.migrateFrom(...) / migrateKey(...)(也在构建器上)适用于任何配置,无论由哪个库生成。
- 支持的文件: TOML、JSON5 和 JSON,嵌套或扁平。
- 何时运行: 在
load()期间,且仅当 Dungeon Config 文件尚不存在时。 - 值如何匹配: 首先匹配重命名的键,然后匹配相同的点分路径,然后匹配相同的最后键名(忽略大小写、
_和-)。 - 之后: 每个被读取的文件重命名为
<name>.migrated。
9. 名称、描述和界面主题
语言键
界面会在你自己的语言文件中查找这些:
"mymod.config.title": "My Mod Settings",
"mymod.config.category.gameplay": "Gameplay",
"mymod.config.section.homes": "Homes",
"mymod.config.option.auraRadius": "Aura Radius",
"mymod.config.option.auraRadius.desc": "How far the aura reaches, in blocks."
缺少键时的回退:
auraRadius变成 “Aura Radius”。- 描述回退到条目的注释。
- 分类和分区按原样显示。
在描述中,%s 被替换为 config/<modid>。
jar 中的默认媒体
assets/<modid>/dungeonconfig/bg/            png、jpg、gif、mp4、webm…
assets/<modid>/dungeonconfig/bgmusic/       ogg、wav(其他格式需要 FFmpeg)
assets/<modid>/dungeonconfig/fonts/         title.ttf、heading.ttf、body.ttf、value.ttf(.otf 也可以)
assets/<modid>/dungeonconfig/colors.json5   配色方案
背景和音乐如何选择:
<正在加载版本记录…
正在加载评论…
评论在新手盒子客户端中发表,这里同步展示。